Tag Archives: how-to

January Meeting Recap

On Saturday, January 20, 2024, PWCARES held their regular January Training meeting. These are the highlights.

Upcoming Events

Marine Corps Marathon Office

  • Saturday, March 23: MCM 17.75 Run in Prince William Forest Park. Sign up link was sen by email with the password for the site.
  • Sunday, May 19: MCM Historic Half in Fredericksburg, VA. Details will come out by email mid-March
  • Saturday, August 24: MCM Quantico 12K at MCB Quantico. Sign up details will come out by email
  • Sunday, October 27: Marine Corps Marathon. Sign up details will come out by email
  • Saturday, November 23: MCM Turkey Trot at MCB Quantico. Sign up details will come out by email

Willing Warriors

  • Saturday, July 6 (est): Vettes for Vets. Sign up details will come out by email
  • Saturday, September 7 (est): Warrior Ride. Sign up details will come out by email

Other Events

  • Saturday/Sunday June 22 & 23: Field Day

Action Plan

If you have not reviewed the Action plan lately, please, do so. Pay particular attention to Section 5 and Section 6.

Training

There are no major changes to our training plan. If you have not already taken the basic ICS courses (IS-700, IS-800, IS-100, IS-200) please do so. These courses do not expire, so if you already took them, there is no need to retake them. There will be some new courses coming soon.

Blinky Yellow Lights

A major update to the Virginia code that impacts us. We can now use flashing amber lights under limited conditions while exercising and working events. Specifically:

  1. Vehicles used or operated by federally licensed amateur radio operators (i) while participating in emergency communications or drills on behalf of federal, state, or local authorities or (ii) while providing communications services to localities for public service events authorized by the Department of Transportation where the event is being conducted;

We will be using amber lights for all our events where they make sense. If you wish to purchase your own, there are a number of options. For MCM events, people that wish to borrow a light can do so.

Workshop

The workshop discussed what you would need to bring to a long deployment. We came up with this criteria:

  • A deployment where you will be away from home in excess of 24 hours
  • A deployment where you will have to be self-reliant for more than 72 hours

And played with this scenario:

  • It is April
  • Spring flooding in SW Virginia
  • Teams are being bussed from the EOC to a camp outside Roanoak
  • Each position will have a radio, power, antenna, table, and chair provided
  • Each operator will work an eight hour shift, with at least one of them being over night
  • There will be some sort of food & beverage service along with some sort of sanitary facility at the camp

Three hours before departure, we get the following update:

  • We are in the first wave
  • Showers are expected over the next 24-48 hours
  • Temperatures over the next five days are middle 40s to low 50s.

Some of the points we covered included:

  • Shelters – are we providing them, are the camp? Do we need to make coordinate with each other on what we bring? Certainly coordinating would be valuable. Also we might need some sort of shelter at our operating position
  • Lights – we may need lights at our operating position and some way to refresh them (batteries, charging, etc.)
  • Food – we should not assume we are getting more than PB&J sandwiches for food. So what are food options we can take with us?
  • Sanitary facilities – Could be slit trench. Could be running water. We don’t know. What would we need to have in our bags?

These were only some of the things we covered. There are several other things to consider.

Web Links

Winlink on VHF Options

As part of Sunday’s discussion about Winlink, the question of what if we don’t have a packet TNC came up. There are two options. One is VARA with a Signalink, and the other is software from UZ7HO. During the discussion we talked about VARA, and made a startling discovery.

1) VARA, while it can be used as freeware, limits the throughput. A license costs $70.

2) VARA will only talk to stations running VARA. A serious handicap here in Prince William County as none of our VHF/UHF nodes are running VARA (we run packet TNCs).

We will have to experiment with the alternate software. Until we get time to create some documents, K6OLI has posted this very comprehensive walkthrough for using UZ7HO’s software (a separate download, link in the document) that I suggest those with Signalinks or other non-packet TNCs take for a spin.

The Winlink Configuration session is now available to view.

Vests for Deployment

Back in 2010, the ARRL announced the official vest we are supposed to wear:

ARES members, while activated, deployed, in community service activities or otherwise on duty shall wear over their normal apparel, at minimum, a florescent green ANSI Class 2 reflective, 100% polyester vest. The vest shall be decorated in the following manner:

On the Back:

In minimum 2” lettering, Arial Black font, black in color, imprinted above the horizontal reflective tape:

AMATEUR RADIO
EMERGENCY
COMMUNICATIONS

Those in a leadership position may add their title (SEC, DIRECTOR, EC, PIO, etc) below the words “Emergency Communications” in not less than 3″ tall font, black. (Under the lower reflective stripe). Local jurisdictions may elect to add their organization name above the words “Amateur Radio” with no larger than 1″ Arial Black lettering, color black.

On the Front:

On the Left Chest, the ARES logo, minimum 3.5 inch diameter, black in color, negative background. The Right Chest shall remain blank so as to allow wearer to affix their ARES or ARRL name badge.

Vests may have zip or Velcro type front closures. Members may choose vests with or without pockets, at their own discretion. Other apparel, such as short and long sleeve tee shirts, jackets and coats are approved for member use as long as the garments meet the same color, ANSI Class 2, lettering and decoration standard. A waiver of this standard may be given by an SEC for specific purposes with good cause.

Florescent green is the same as fluorescent yellow, which is what most vendors call it. It is not the same as fluorescent orange, which is what hunters generally wear.

The League sells a mesh vest, but the quality is questionable if you expect to use them frequently. They also have a solid vest, which is a bit more solid, but I think those of us that have used them find they are not a lot better, especially for multiple deployments  (I have gone through several vests in a year). They also lack pockets or MOLLE attachments, which several have found to be a disadvantage.

Andy, KJ4MTP, Tom, W4PIO, and I have moved to a sturdier surveyor’s style vest. I can report that it has survived a couple of washings already, which is more than the League’s vests did. The problem with the non-league supplied gear is having to be handy with a needle and thread, or know someone who is, and pick up the associated panels. (Links below)

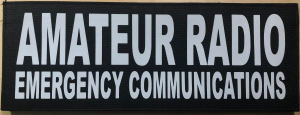
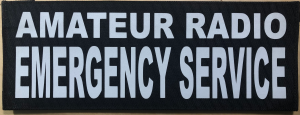
CopQuest (link below) has a panel that is 11″ by 4″ where you can get either combination:

Amateur Radio Emergency Service Badge
Big Amateur Radio, little Emergency Communications

Little Amateur, Big Emergency
Little Amateur Radio, Big Emergency Communications

The bigger letters are 2″ while the smaller letters are only 1″, so while it does not meet the letter of the requirement, it certainly meets the spirit and, it is reflective, unlike the League’s offering, which is matte black. Only the tape around the vest is reflective. If you do enough outside nighttime events, you will appreciate the additional ability to glow in the dark.

I generally wear the former with the larger Amateur Radio so as not to be confused as part of the Emergency Service.

PWCARES Badge
PWCARES Fabric Badge

Similarly, most of us use our fabric badge instead of having the ARRL ARES logo imprinted on the vest. You can quickly sew a small strip of velcro on the back (or use the pre-adhesive version) and stick it to one of the velcro mounting points on the vest. The downside to the pre-adhesive version is our summer weather. Over time the glue begins to deteriorate. I have looked at morale-styled badges (with hook velcro all over the back) but there is an increased cost. Until we run out of the current badges, we will continue to use these. If you are new to the Cadre, you are entitled to one badge. If you need to get more, please visit our swag link to order one.

If you have any questions, please feel free to drop me a note.

Weblinks

Compiling fldigi on the Raspberry Pi

Why, one might ask, would one want to run fldigi on a raspberry pi? Perhaps you want to get familiar with Linux before sacrificing a larger system to it.  Maybe you feel like you need practice compiling software. And maybe, you are like me, and when asked I said, “Because I can?”

Whatever your reason, the raspberry pi is not the ideal platform to run fldigi on, but it is not a bad platform for demonstrations, and testing.  But getting from here to there is not straight forward.

Now, you don’t have to compile the code.  You can pull a version from the repos with:

sudo apt-get install fldigi

But the version you are grabbing may not be the most recent one, and there are occasionally some issues with backwards compatability.  I did try downloading the precompiled binary but at least for version 3.21.78, the binary did not run on the pi, even though it ran without issues on Ubuntu on my netbook.

Which leaves the tried and true method. Compile the code from scratch.  And I thank the developers for providing the source code that allows me to do this.

But, like most software, when you start down the path of compilation, you occasionally have to make a detour (or three) to get it working right. So I will help here by taking you down the road I went, but I don’t guarentee you will get there from here.  This is just what I did, and what I wrestled with getting there.

One thing I will point out is that this is a long process, partly because of the number of packages that need to be fetched and installed and partly because of the capabilities of the pi.  Can you do it all in one sitting? Yes. But you might want to plan to take a couple of breaks along the way.

Ready?  Here we go…

In the beginning

Before you begin, you need a running Pi. I am going to assume you have already installed the software, and performed the inital configuartion, but not much more. If it has been a bit since you lastupdated your Pi, you might want to do that first. By the way, I will assume throughout that you are connected to a live Internet connection and have already figured out how to log in. Most of the following commands are excuted at the command line.

  • Update the repository on your Pi:
sudo apt-get update
  • Actually upgrade the Pi:
sudo apt-get upgrade

It might take a couple of minutes for this to grind through all the packages it needs to get, and then update.

Although you do not have to reboot the pi, if you got a new kernel during your update, it will benefit you to reboot and make sure the new kernel is working properly before you dive into the next part.

To reboot, you can issue this command:

sudo init 6

You can also issue this:

sudo shutdown now -r

Now that the software is up to date, and the kernel is good, we can get serious!

Prerequisits

Before you can begin, you should grab all the files you will need. I find it easiest to put all my downloads into a single place, called source, so I can find them when I am looking for them later.

mkdir source

Depending on how you download your code, you can open a browser and download it (suggested because how often fldigi changes) or you can use wget.  Grab the files you want from the fldigi download site. You will also need some other files.

  • Install the X11 development libraries (we will do that in a minute)
  • Install the libpng development libraries
  • fltk. I used version 1.3.2 (http://www.fltk.org/software.php)
  • Python Setup Tools (incl Easy Install)
  • Secret Rabbit Code. I used version 0.1.8. You need this for the samplerate python code (http://www.mega-nerd.com/SRC/download.html)
  • scikits.samplerate. I used version 0.3.3. (https://pypi.python.org/pypi/scikits.samplerate)

Install the development libraries from the repositories:

sudo apt-get install libx11-dev libpng12-dev python-setuptools python-dev python-numpy python-scipy libblas-dev liblapack-dev

It will ask to install some additional dependancies. Say yes and let it go.

Compile the fltk toolkit

  1. Chage into the source directory.
    cd source
  2. Untar the source file (I will only document this once – I will assume you can follow along after this).
    tar zxvf fltk-1.3.2.tar.gz
  3. Change into the fltk directory.
     cd fltk-1.3.2
  4. Configure the source tree and makefile (note the dot before the slash – you have to do that or it will error out at you).
    ./configure
  5. Compile! (and grab a snack…took about 15 minutes).
    make
  6. Install the software.
    sudo make install
  7. With luck, there are no errors and the software is installed.  I did get a few errors about depricated code in the X11 libraries that the fltk program warned about, but did not error out at compile time. You can safely ignore those sorts of errors.
  8. You are done with this step.

Compile the samplerate toolkit

  1. Chage into the source directory, untar the file and move into the directory.
  2. Configure the source tree
    ./configure
  3. Take note of the compiling information
    Compiling some other packages against libsamplerate may require the addition of "/usr/local/lib/pkgconfig" to the PKG_CONFIG_PATH environment variable.
  4. Compile! (It takes a bit to compile this code, be patient)
    make
  5. Install
    sudo make install
  6. Update the package configuation path (PKG_CONFIG_PATH) – command is all on one line.
    export PKG_CONFIG_PATH=/usr/local/lib/pkgconfig
  7. Move into the scikits.samplerate directory
  8. Python programs are or can be a bit tricky.  When in doubt, alway review the README to make sure nothing has changed.  You may need to do this first:
    sudo easy_install -U distribute
  9. Move into the scikits.samplerate directory and run setup.py
  10. python setup.py
  11. You will get a menu like this:
    pi@jake:~/source/scikits.samplerate-0.3.3$ python setup.py
    ========================================================================
    Starting interactive session
    ------------------------------------------------------------------------
    
    Tasks:
      i       - Show python/platform/machine information
      ie      - Show environment information
      c       - Show C compilers information
      c - Set C compiler (current:None)
      f       - Show Fortran compilers information
      f - Set Fortran compiler (current:None)
      e       - Edit proposed sys.argv[1:].
    
    Task aliases:
      0         - Configure
      1         - Build
      2         - Install
      2 - Install with prefix.
      3         - Inplace build
      4         - Source distribution
      5         - Binary distribution
    
    Proposed sys.argv = ['setup.py']
    
    Choose a task (^D to quit, Enter to continue with setup):
  12. Choose 0 to configure, then press Enter. It will dump you at a “press Enter to close.” Go ahead and press enter.
  13. Start it again, select 1. Press Enter and it will start building (you might get a few warnings). Press enter to be returned to the command line.
  14. To install the packge, start it again, with sudo:
    sudo python setup.py
  15. Press enter to return to the command prompt. You are done with this step.

Comple fldigi

  1. Change directory to the source directory and untar fldigi, then move into the fldigi directory.
    cd ~/source
    tar zxvf fldigi-<version>.tgz
    cd fldigi-<version>
  2. Configure the software source tree and makefile.
    ./configure
  3. Compile! And grab a snack…it takes a bit and maxes out the CPU.
    make
  4. Install
    sudo make install
  5. And that is that. You can now fire it up by opening up and testing it. The most straigtforward way is to click on the bird-like icon on the far bottom left corner, which brings up a pick list. Slide up to “Internet” and Fldigi is on the list. Click on it and it will start. (Fldigi does not like running through vnc).
  6. Now on to the other software! (What you thought you were done?)

Next, we will compile and install flmsg.